
On 3 September 1944, the British 11th Armored Division entered Antwerp, Belgium, Europe’s second largest port—and the world’s third largest.1 The value of the Allied victory there was limited, however. The port sat at the end of the 40-mile-long, east-to-west Scheldt River Estuary, and the Germans occupied both banks, dug in tightly. The river’s north bank consisted of a string of islands jutting into the North Sea, including the two Beveland islands and Walcheren at the western end. Large-caliber guns defended the seaward approaches, and the Germans had mined the local waters.
Opening Antwerp was critical, because the Allies’ overland logistical tail was too long, stretching all the way back to the artificial Mulberry harbors at the Normandy beaches. Antwerp was the only serviceable port available to the Allies for the advance into Germany. Opening it necessitated clearing the banks of the Scheldt and sweeping mines from the sea.
But Field Marshal Sir Bernard Montgomery’s Operation Market Garden—an attempt to advance far into the Netherlands to cross the Rhine River—came first, commencing on 17 September. Even after its failure, Montgomery remained preoccupied with trying to cross the Rhine, ignoring the need to open the Scheldt for almost a month. It took the combined efforts of General Dwight Eisenhower, Field Marshal Sir Alan Brooke, and Admiral Sir Bertram Ramsay to switch Montgomery’s priorities. The delay gave the Germans time to prepare.
They fortified the southern bank of the Scheldt, creating what became known as the “Breskens Pocket,” defended by the combat-seasoned 64th Infantry Division. The Germans flooded thousands of acres of farmland, leaving the elevated roads as the only avenues of advance open to the Allies. German gunners zeroed in on these avenues with artillery and constructed elaborate obstacles that included antipersonnel and antitank mines.2
By 23 September, the Germans had transferred almost 86,000 men across the Scheldt onto Walcheren and the Beveland islands. In addition, the 1st Parachute Army—elderly men, boys, and sick and wounded soldiers and sailors—was ordered to hold a line between Antwerp and Maastricht, while the 716th Infantry Division was to hold Woensdrecht, the town that commanded the approach across the isthmus onto South Beveland.3
Three Operations to Victory
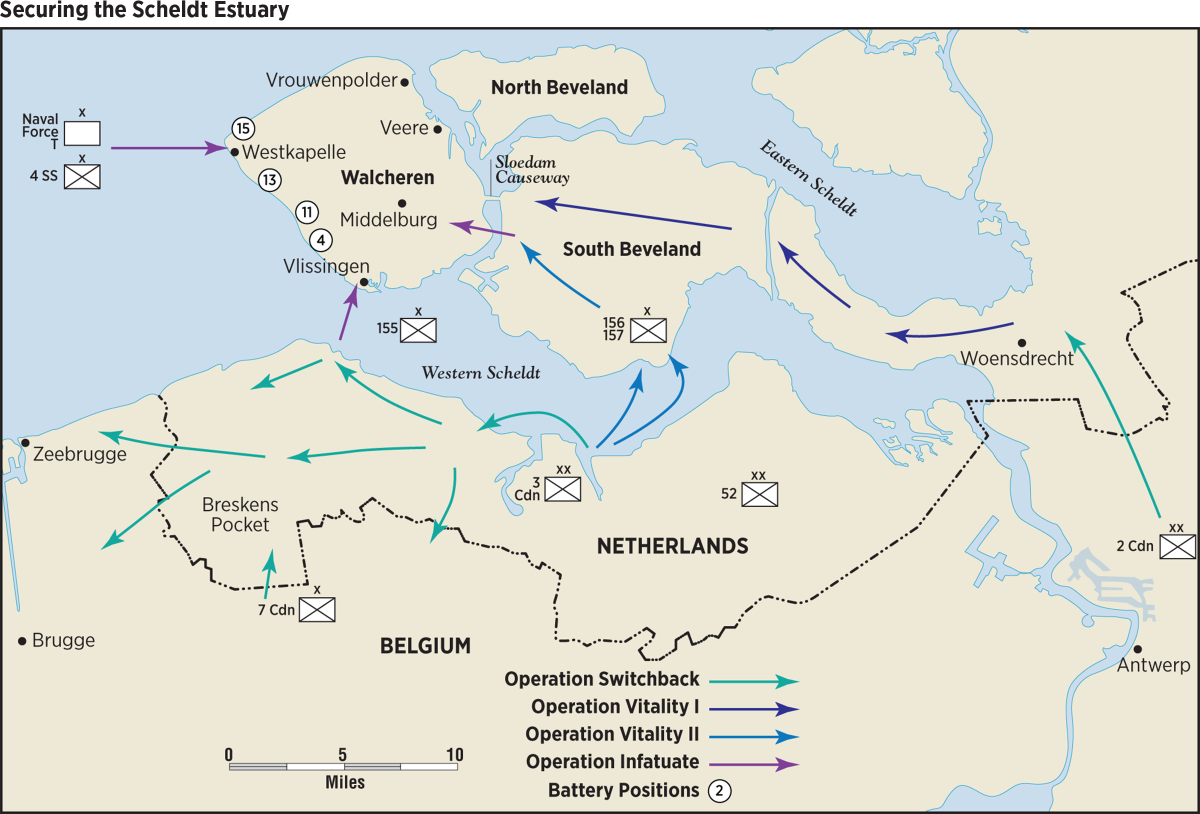
Montgomery’s plan consisted of three stages. The first, Operation Switchback, called on the Canadian 3rd Infantry Division and 7th Infantry Brigade to seize the Breskens Pocket and the Scheldt’s southern bank. The Canadian 2nd Infantry Division, with the Canadian 4th Armored Division, would advance northward to cut off the Germans on South Beveland from the German Antwerp/Maastricht defense line.
Once Switchback succeeded, the two-stage Operation Vitality would commence. Vitality I directed the Canadian 2nd Infantry Division to cross the isthmus to force a bridgehead onto South Beveland. Vitality II would be an amphibious assault against South Beveland from the Scheldt’s southern bank. Two brigades from the 52nd Lowland Infantry Division were selected for the assault. They would be transported by Royal Navy assault landing craft (LCAs) and U.S.–designed tracked landing vehicles (LVTs), which the British called Buffalos. Eighteen swimming Sherman tanks would cross, too. Vitality II’s second phase required the seizure of the Sloedam Causeway.
Infatuate
The final and most complicated operation was Infatuate, a three-pronged assault on Walcheren Island. First, the Canadian 2nd Infantry Division, moving from South Beveland, would cross the causeway onto Walcheren.
Second, a predawn amphibious assault from the Scheldt’s south bank would seize Vlissingen (Flushing).4 There, 4 Commando and a brigade each from the 52nd and 79th’s armor would directly assault the port, arriving before sunrise in Royal Navy LCAs and tank landing craft (LCTs). The Royal Artillery, positioned on the south bank, would provide fire support for the assault. With a beachhead established, the Second Tactical Air Force would provide close-air support.
Third, the Royal Navy would assault the western side of Walcheren at Westkapelle. Admiral Ramsay directed Captain Anthony Pugsley to collect the required shipping. He selected the Support Squadron Eastern Flank (SSEF).5
Known as Naval Force T, SSEF had been formed to protect the Normandy beaches with specially configured LCTs. The LCTs were twin-screw, diesel-powered ships, just under 200 feet long and displacing 300 tons. Each had her well decks plated over and configured for attacking heavily fortified coastal positions. The LCTs had four variants.
Six large gun variants would remain offshore, while two medium gun craft would beach themselves and take on the concrete-encased coastal guns and pillboxes. Five equipped with rockets would lay down a barrage, while six antiaircraft-defense LCTs were selected to pepper German defenses with massive automatic weapons fire.
Somewhat confusingly, the six infantry landing craft small (LCI[S]s) were configured as landing craft support large (LCS[L]s) with three serving as fast rescue craft. Two headquarters landing craft (LCHs), another LCI(S) variant, served as Naval Force T’s tactical headquarters. Each had the staff and communications to direct the assault forces and liaise with Pugsley’s frigate, HMS Kingsmill, a U.S.-built Evarts-class destroyer escort.6 The SSEF craft were manned by the Royal Navy, with their guns operated by Royal Marines.
The battleship HMS Warspite and the monitors Erebus and Roberts were assigned to use their 15-inch guns to destroy the heavily fortified shore batteries.7
The 4th Special Service Commando Brigade, composed of 41, 47, and 48 Royal Marine Commando, together with the 10th (Inter-Allied) Commando would execute the attack just after daylight. The 10th consisted of Belgian, Dutch, French, and Norwegian troops. The brigade would assault the beaches near Westkapelle, with the 79th’s antimine “flail” Sherman tanks, bridge-laying Churchill tanks, and spigot-mortar-equipped Churchills, as well as the flamethrowing Churchill Crocodiles in support. The commandos would ride in the Buffalos.
Montgomery gave joint operational control to Canadian Lieutenant General Guy Simonds and Admiral Ramsay. Tactically, the assault on Walcheren was left to Pugsley and Brigadier B. M. Leicester of the Royal Marines. Once ashore, the marines would be under the control of Major General Edmund Hakewill-Smith, commanding the 52nd Lowland Infantry Division.8
Allied air forces also would take part. Air Chief Marshal Sir Trafford Leigh-Mallory agreed to General Simonds’ imaginative idea of using heavy bombers to breach the dikes protecting Walcheren to flood the island and force the Germans to higher ground. However, Leigh-Mallory committed a minimum of his bombers against the large-caliber coastal batteries. It would be up to the Royal Navy and the Second Tactical Air Force to finish the job. This would prove to be insufficient.9
The Germans lacked a functional joint-service command structure. The Wehrmacht was responsible for the eastern defense of the island through South Beveland. The Kriegsmarine was charged with defending Walcheren’s seaward coastline as well as the entire Scheldt Estuary, while the Heer (the army) commanded the garrisoned infantry. In addition, the services’ headquarters were physically separated. One salient indication of the split command structure was that the army did not provide infantry support to defend the Kriegsmarine’s coastal batteries. Once the assault began, the sailors were left to defend their gun emplacements alone.
The Assaults Begin
Flying in daylight at low level, Royal Air Force (RAF) Lancaster bombers hit the dike adjacent to the town of Westkapelle, breaching it on 3 October. On 7 October, the dikes east and west of Vlissingen were breached. By 11 October, most of Walcheren was inundated.
This neutralized many antiaircraft and field-gun batteries and isolated German mechanized and infantry forces. During the next few days, tidal action widened the gaps. The only parts of the island remaining dry were the coastal dunes, Vlissingen and the high ground east of the town, Middelburg, and the road embankments running between them.
On 6 October, Switchback commenced. Eliminating the German defenses and seizing the Scheldt’s south bank took 18 days. On 24 October, Operation Vitality I began, with the Canadians striking north from Antwerp toward the South Beveland Isthmus.
The first phase of Vitality II began two days later. Departing from the Scheldt’s south bank in Buffalos and Royal Navy LCAs, the brigade from the 52nd Lowland Division crossed a nine-mile stretch of water to land on South Beveland. By 31 October, the peninsula was in Anglo-Canadian hands.
On 1 November, Infatuate I commenced with 4 Commando landing at Vlissingen. Supported by Royal Artillery positioned on the south shore and by waves of Mosquito fighter-bombers, the commandos and the 4th Battalion, the King’s Own Scottish Borderers, poured into the western part of the town, surprising the Germans. However, the Kriegsmarine defenders quickly responded. It took two days of house-to-house fighting to clear Vlissingen.
The second phase of Vitality II began with the 2nd Canadian Infantry Division attacking across the 1,200-yard-long, 40-yard-wide Sloedam Causeway connecting South Beveland with Walcheren. Bracketed by tidal mudflats, the causeway came under intense enemy fire. Clearing it proved extremely costly in Canadian lives.
On 2 November, the Canadians established a fragile bridgehead on the Walcheren side of the Sloedam before being relieved by the 52nd. Hakewill-Smith, the division commander, did not want to repeat crossing the causeway in a suicidal, frontal attack. He ordered reconnaissance of the mudflats to see if they offered an alternative.
During the night of 1–2 November, two volunteers crossed the mudflats successfully. The next night they returned and, with three Royal Engineers, laid out marker tapes across the expanse and cleared mines to make a narrow path. By sunset on 3 November, another foothold was established on the Walcheren side, allowing the Allies to outflank the Germans besieging the troops holding the causeway.10
Attacking Westkapelle
While the Royal Marines and the Scots were landing on 1 November, Naval Force T was making its approach toward Walcheren to smash its way ashore.
Shortly after 0800, the aerial bombardment began. However, fog and a low ceiling reduced accuracy. The two major German batteries, W15 and W13, were less affected by the weather, and they took a heavy toll on the ships.
At 0830, Captain Pugsley made the signal “Nelson” to his forces, and the landings commenced in full view of the German defenders. Supported by Royal Artillery on the south shore, RAF fighter-bombers, and the Warspite, Roberts, and Erebus, the Royal Marines landed on three beaches adjacent to the breached dike at Westkapelle. They were: Tare Red to the north; Tare White through the gap itself; and Tare Green on the south side.
By 0900, four of the six large gun craft had been sunk, along with one of the medium craft, when it pulled itself off the beach after scoring hits on a pillbox. On the northern flank, one antiaircraft LCT was put out of action and another large gun landing craft sank. All five rocket LCTs managed to fire their weapons, but the rockets from one landed short, among the approaching SSEF vessels and the follow-up boats filled with marines.
A half-hour later, HMS Roberts silenced two of the W15 battery’s four 3.7-inch guns, while W13’s 150-mm guns ran out of ammunition. This saved what was left of the SSEF and the oncoming LCTs filled with marines and supporting armor. The first and successive waves landed with few casualties.
At Tare Red, three troops (platoons) from 41 Commando landed with the Sherman flail tanks and Armoured Vehicles Royal Engineers (AVREs), moving north through Westkapelle and along the narrow dike toward the coastal gun batteries.
At Tare White, the remaining marines of 41 Commando, together with 48, 10 Commando, and the 4th Special Service Brigade, landed adjacent to both sides of the gap. The landings on the north supported Tare Red, while the landings south of the gap moved down along the narrow dike toward a coastal radar station and a 150-mm gun battery.
Before the Roberts knocked out W15’s guns, the assault craft heading for Tare Red had come under fire. This caused the assault waves to bunch up and land simultaneously, with much of 41 Commando taking up positions opposite Westkapelle. Seeing the pileup, Pugsley sent the follow-on waves of tanks and AVREs to the northern section of Tare White.
This last-minute redirection compounded the challenge of landing on both sides of the gap, causing three waves to land at essentially the same time. Finally, sufficient force from 41 Commando was organized and able to get off the mud-caked beach with a few tanks to take Westkapelle and W15 by early afternoon on 2 November.
Three of the four German gun batteries covering the Scheldt were in British hands by nightfall. After taking W15, 41 Commando pushed toward Domburg, capturing W17. W13 fell to 48 Commando in a classic set-piece action, with the Royal Artillery and RAF Typhoons laying suppressive fire. The final guns—south along the narrow, sandy dike at W11 and W4—fell to 47 Commando later that day, before the unit linked up with the Vlissingen beachhead.
This opened the Scheldt for minesweepers, which entered it on 3 November, reaching Antwerp on the 4th. (Continual minesweeping operations allowed the first three cargo ships to arrive on 26 November.)
On the 6th, German resistance collapsed along Walcheren’s south and northwest shores, including at Middelburg. The following day, German defenders in Veere surrendered. Only Vrouwenpolder and its immediate environs remained in German hands, soon to be overcome by the 4th Special Service Brigade. All organized German resistance ended on the 8th.
Casualties among the victors and the island’s population continued to accrue in the following weeks, however, as the Allies rounded up isolated groups of Germans and cleared the island of mines and booby traps.
Aftermath
Congratulations poured in, especially from Montgomery, who in his unstinting praise admitted his error in delaying the attack. Pugsley, in his book Destroyer Man, praised Naval Force T, writing:
Walcheren had been a costly affair for the Royal Navy. . . . The percentage killed or wounded . . . was grievously high and gives evidence of the valour displayed in pressing home their attacks with such grim determination. It can safely be said that but for the selfless devotion of the Support Squadron, the assault on Walcheren would have surely failed.11
The SSEF paid a terrible price. Of its 27 vessels, 9 were sunk and 8 were put out of action; only 10 emerged unscathed. The personnel loss was staggering. Author Gerald Rawling notes, “Of the crews, 172 were killed and 125 wounded out of 1,030 engaged, a shocking 29 percent.”12
The importance of the operation cannot be overstated. Less than a month after Antwerp opened to shipping, the Germans launched the Ardennes offensive, with Antwerp and Brussels as the objective. The ability rapidly to bring men and equipment into the theater through Antwerp proved crucial in defeating Adolf Hitler’s great gamble.
After the battle, 87 percent of Walcheren was underwater. Royal Engineers and the islanders worked tirelessly to rebuild the dikes. Leftover caissons from the Mulberry harbors were used to plug the gaps, but it took until February 1946 to fill the last. It was another year before the ground dried enough to replace the trees lost to saltwater inundation.13
Today, Walcheren is no longer an island, the Sloe Channel having been filled in. But reminders of the battle—monuments to the British and Canadians who fought to free it from the Germans—dot the shoreline and Walcheren’s interior.
1. Gerald Rawling, Cinderella Operation: The Battle for Walcheren 1944 (London: Cassell Ltd, 1980), 5.
2. Jeffrey Williams, The Long Left Flank: The Hard Fought Way to the Reich, 1944–1945 (Toronto, ON: Stoddart Publishing Co., 1988), 114–15.
3. Rawling, Cinderella Operation, 28.
4. Williams, The Long Left Flank, 130.
5. RADM A. F. Pugsley, RN, with CAPT Donald Mcintyre, RN, Destroyer Man (London: Weidenfeld & Nicolson, 1957), 175–78.
6. Donald Collingwood, The Captain Class Frigates in the Second World War (Annapolis, MD: Naval Institute Press, 1999), 200.
7. Pugsley, Destroyer Man, 184
8. Richard Brooks, Walcheren 1944: Storming Hitler’s Island Fortress (Oxford, England: Osprey Publishing Ltd, 2001), 11.
9. Rawling, Cinderella Operation, 67.
10. Rawling, Cinderella Operation, 84.
11. Pugsley, Destroyer Man, 201.
12. Rawling, Cinderella Operation, 122.
13. Kirk W. Goodlet, “‘Reduced to the Banks of Mud from Which They Were Reclaimed’: The Province of Zeeland, War and Reconstruction, 1940–1945,” Canadian Journal of Netherlandic Studies 34, no. 2 (2013).